Motorcycle Maintenance
Bike Maintenance

COMPLETE RIDER
Your complete guide to Better, Safer, Smarter Motorcycling. 163 Pages of vital information to make your life on a bike even more enjoyable. Presented in a modern entertaining fashion with up-to-date and detailed information on all aspects of motorcycling including Obstacle Avoidance, Braking, Cornering, Roadcraft, Human Factors, Carrying a Passenger plus much more. All finished off with a comprehensive Drills section to make sure you get it right. The eBook starts at less than a tank fuel in your bike.
Published by: Complete Rider Media Pty Ltd Copyright © 2022 by Anonymous Rider / Complete Rider Media Pty Ltd All rights reserved. Unless stated otherwise, this book excerpt and all its components (including images and text) is copyright. Apart from fair dealing for the purposes of private study, research, criticism or review as permitted under the Copyright Act 1968 (Cth), no part of this publication may be reproduced, copied, distributed, or transmitted in any form other than how it appears here. This excerpt may be shared only as it appears here. Contact: ace@acompleterider.com for permissions.
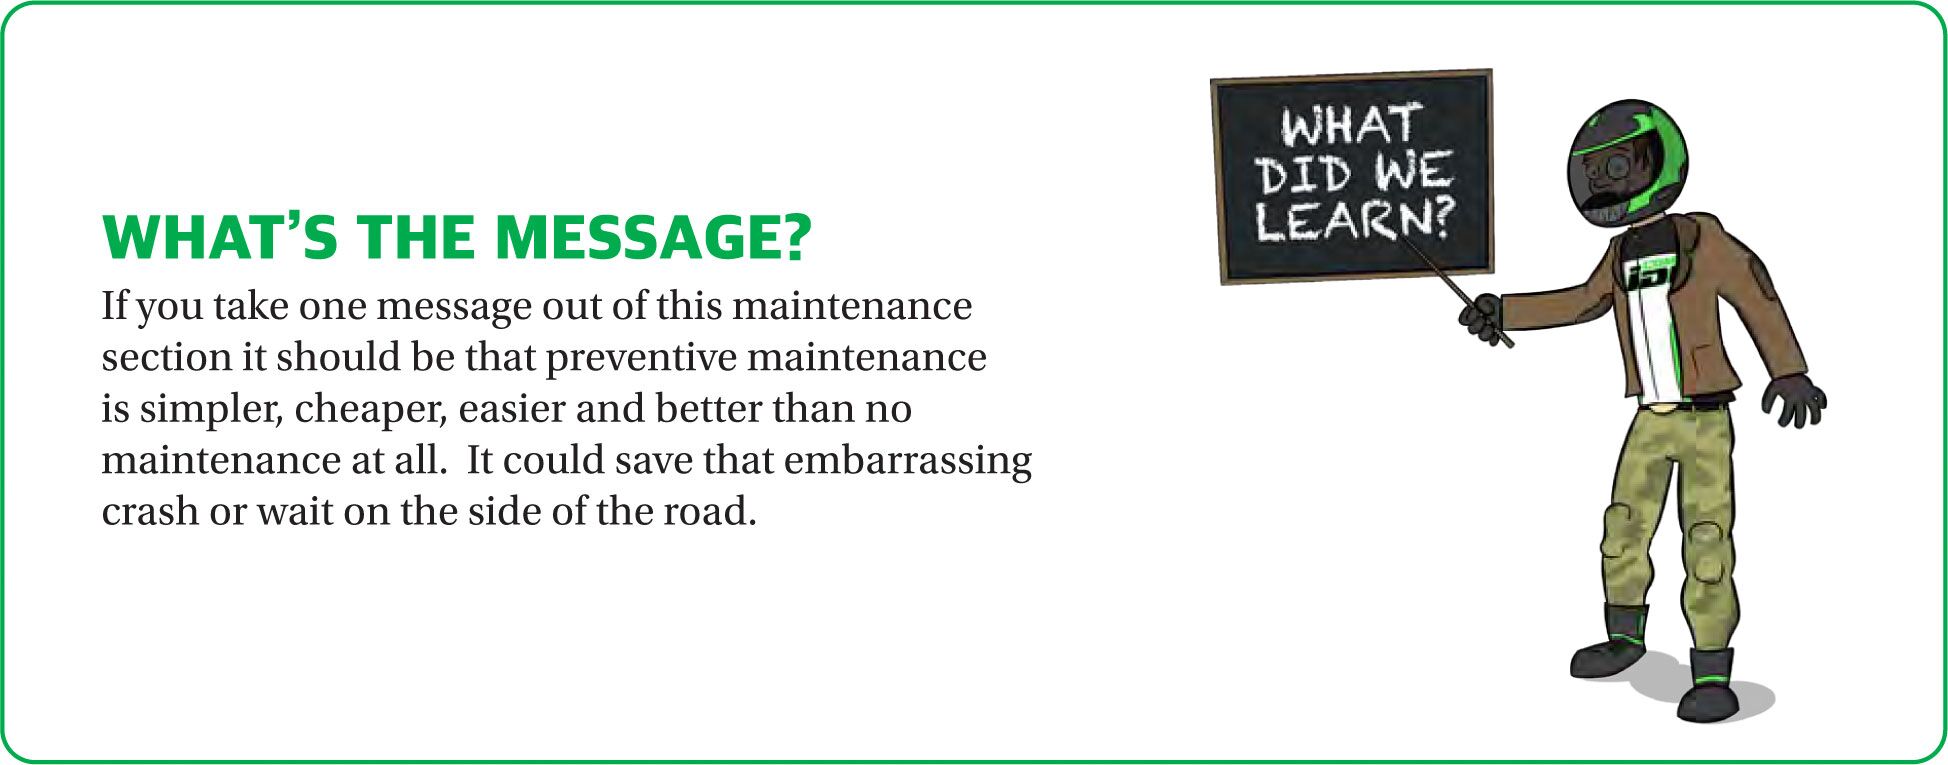
MAINTENANCE
‘Preparation is the key to safe motorcycling!’
This section is not designed to be a ‘total’ bike maintenance section. That’s a whole different world that some people can or can’t do. All this section sets out to give you, the rider, is the basic knowledge of what to look out for and how to keepyour bike in the best working condition. I will guarantee the majority of you will already know most of the things we will cover, but how many of you actually do these basic checks on a regular basis? Of the bikes that I see, especially of novice riders, not many. I sincerely hope the following information is completely useless to you because you already do it.
I had a pretty good idea of what the most neglected areas of bikes generally were but I decided to go and chat to some local bike shops and get their opinions. I wanted to find out what they see most of and they were pretty much the same across all the bike types. None of the jobs listed are even remotely past the ability of any person, no matter how bad you are with a tool or your level of experience as a rider. There are no excuses for not doing this. In fact, you don’t even need to own a single spanner!
If, after reading this you are still not confident you understand any of the procedures or various
Baylink Motorcycle Training Centre is here to help. If you have any questions related to motorcycles please just reach out and ask. There’s always an Instructor around to chat to. CLICK HERE to contact us.
specifics of your bike, make an appointment to take your bike down to your local bike shop and ask the mechanic to explain them to you. Trust me, he or she will be more than happy to share their wisdom with you and probably a little amazed that you really care enough to ask. Keep in mind he or she should be passionate enough about bikes to want to share this information with you and if not, then maybe it’s time to find another mechanic who is.
So, what’s the number one most
ineglected item on a bike?
TYRES!
Yep, tyres are the only thing between your bike and the road surface. Two small patches of rubber that have an extremely important role to play and it’s our job to make sure they can do their job properly!
There are three main areas of concern when it comes to our tyres:
- Pressures
- Tread wear
- Condition
When was the last time you checked
your bike’s tyre pressures? Really?
Tyre Pressure
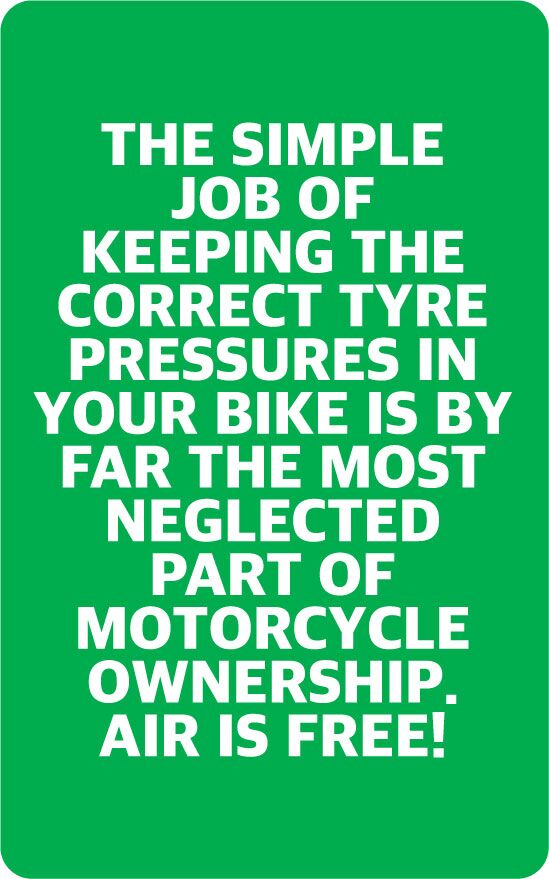
The simple job of keeping the correct tyre pressures in your bike is by far the most neglected part of motorcycle ownership. Air is free! We spend $10,000, $20,000 $30,000-plus on our bike and we forget to put free air in the tyres?
If only we could understand just how bad our bike handles with incorrect air pressure in the tyres, we would check it before each ride. If we knew how much incorrect tyre pressures affect our safety in an emergency situation, we would check them every week. If only we knew how much extra tyre life we could get if we ran the correct tyre pressures, we might even check them halfway through our ride.
So, why is having the correct tyre pressures so important?
Believe it or not, bike manufacturers and tyre manufacturers put a huge amount of time, effort and money into not only matching the right tyre to a bike but also getting the correct tyre pressures for that particular bike. They know how they want a bike to handle and steer and they work hard on the steering geometry to
achieve a correct handling package. They also know how important the correct contact patch is for braking, so the recommended tyre pressures are a compromise between handling, braking, cornering, wear and comfort. If the tyre pressures are incorrect this can dramatically change the bike’s characteristics, mostly to the detriment of you, the rider.
I’m not going to go into too much detail on motorcycle geometry in this book. Like all subjects there is plenty of reading on the internet if this interests you. To give you an idea of how low tyre pressures can change the handling of the bike, old-school racers would raise their front fork tubes up through the triple clamps by ¼ inch or about 6mm, this would dramatically change the steering response. It would make the bike ‘tip in’ quicker which is great for an experienced rider on a track, you can change directions quicker at speed; but as with most things in life, for every positive there’s a negative, the negative being the bike is more nervous at speed and may not cope with high-speed bumps as well, making the bike more dangerous in ‘road-type’ conditions.
Race bikes will run a steering damper to overcome these effects. This is a device that inhibits the rate and amount of steering movement a bike has. Basically, the steering becomes firmer to move, this lessens or eliminates the oscillation or wobble that can happen through a motorcycle’s steering. Running your bike’s tyres at half the recommended pressure could well have the same effect! On a wet road this quick turn-in can have a very unnerving feel, giving you very little confidence in your bike, causing fear or perceived fear, tensing up of our body and loss of bike control. This could end up in a tank-slapper which ain’t good!
We also need to consider the contact patch of the front tyre when braking (re-read the section, How does Tyre Pressure affect Braking page 42).
In cases of extreme low pressures, the tyre could heat up. High temperature is the enemy of rubber tyres (after an initiallyrequired warm-up) and may fall apart or be more susceptible to sidewall damage. Both risk ending in a catastrophic failure which will more than likely end in a crash.
If you run consistently low or high tyre pressures you also run the risk of creating abnormal tyre wear. Some common types of abnormal tyre wear are:
Scalloping, this is where the edge tread blocks wear up and down like a scallop shell, also called
The technicalities of riding a motorcycle can be a little confusing.
At Complete Rider our book and on-line courses have a way of explaining riding techniques in easy to understand language that will have you educating your mates like a boss!
CLICK HERE to view a sample of the book.
cupping. This can cause your bike to handle and feel strange while cornering.
Flat wear, is where the centre band of the tread wears flat. This can also happen if you only ride on straight roads but is accentuated with low or high pressures. This is particularly unnerving when tipping into a corner. To put it simply, you ‘drop off the edge’ of the tyre which means, as you smoothly lean into a corner and the tyre leans past the flattened part of the tyre, the bike will suddenly and drastically lean over, feeling like the bike is going to fall. Probably the worst issue with flat wear is all your mates will accuse you of not ever leaning the bike over! Also known as ‘chicken strips’. Not cool!
These and various other abnormal wear patterns will have you changing your tyres well before you would normally expect to, and if you choose not to, it could end in disaster.
If you want your motorcycle to feel good, to feel right and make you more confident on the bike, check your pressures regularly. It’s a small amount of work for a large amount of gain.
What pressure?
As stated earlier, motorcycle manufacturers put a great deal of effort into selecting tyre sizes, types and pressures to achieve a certain overall feel to their bikes, so you should respect this and not just come up with your own numbers based on what your mate tells you.
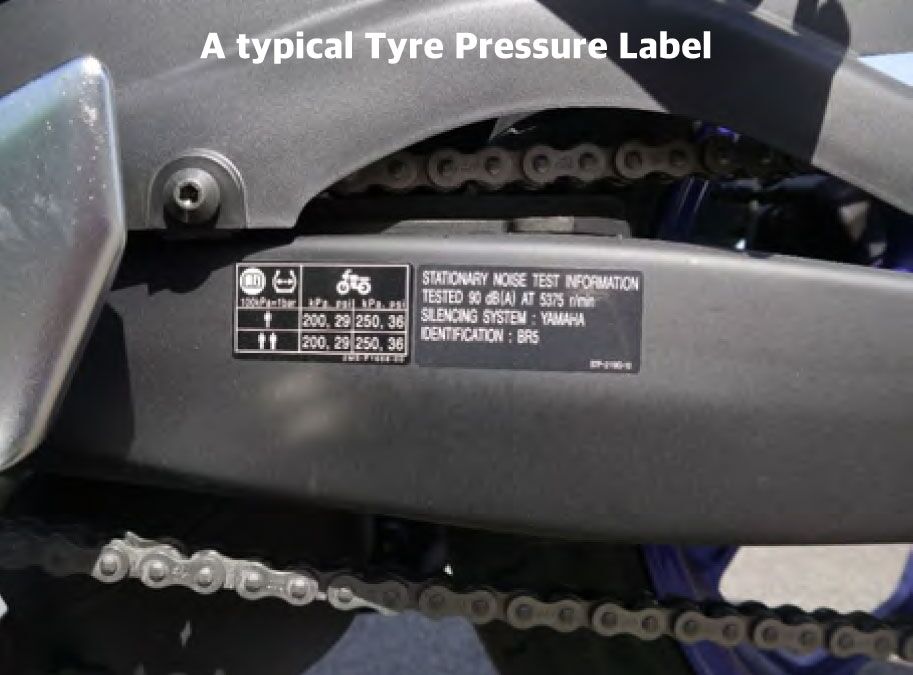
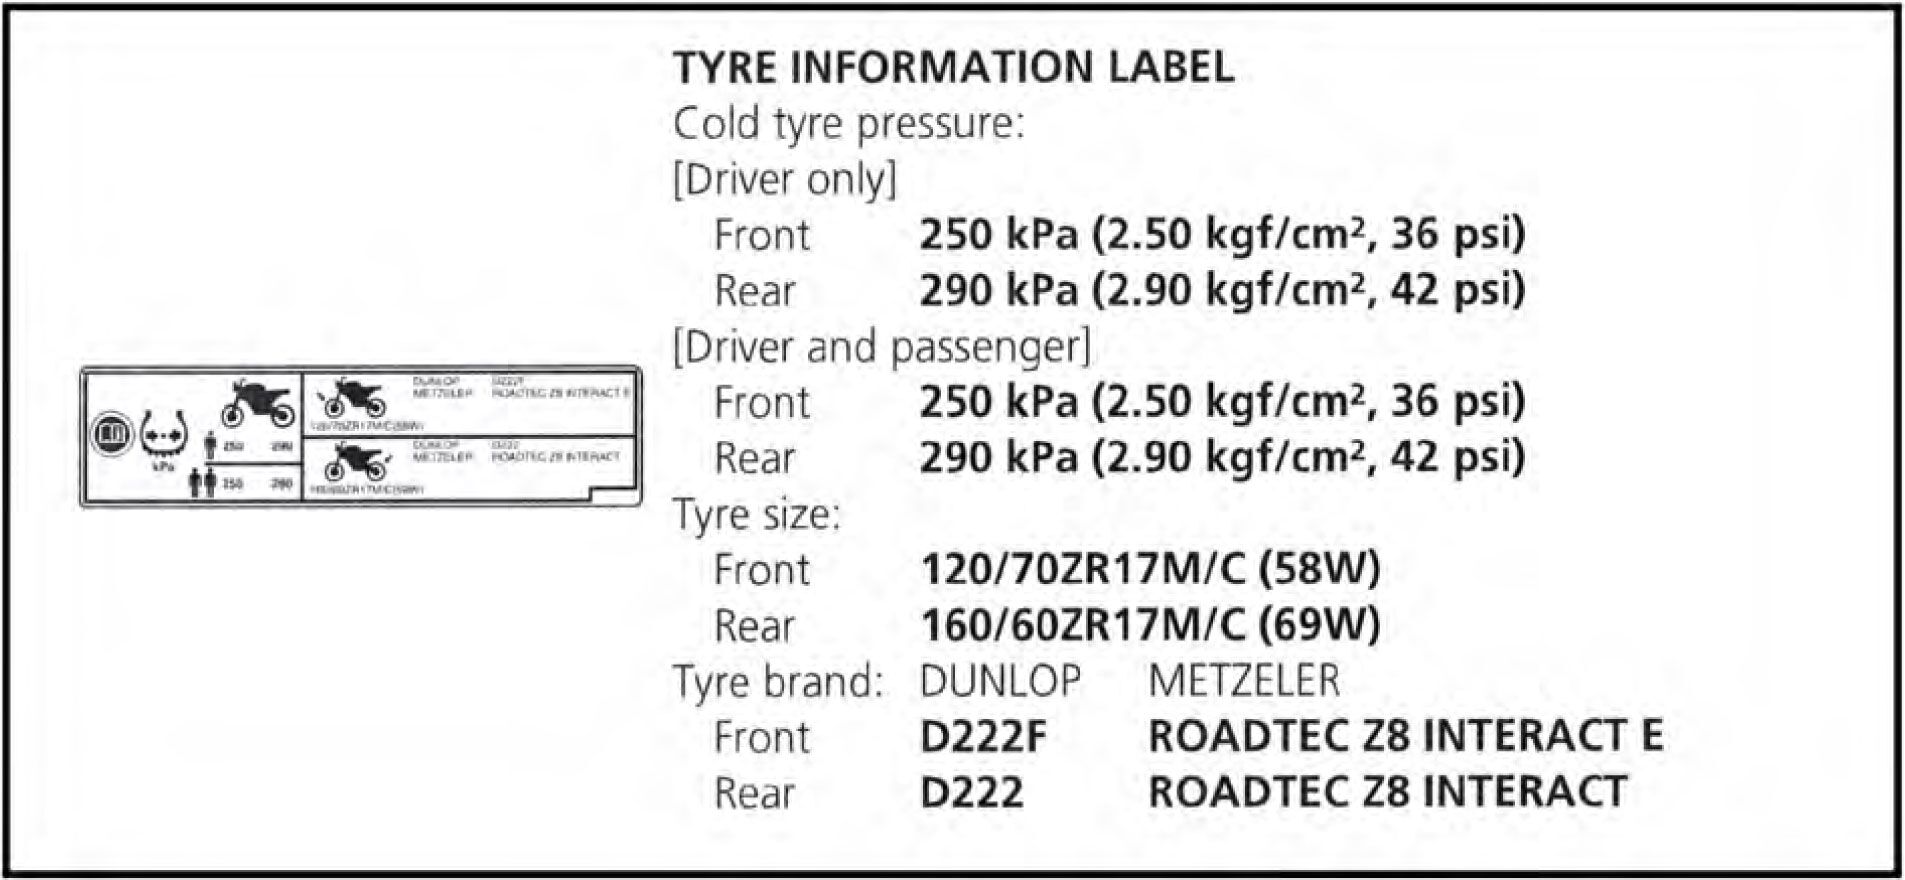
You will find the correct size and pressures either on a sticker on your chain guard or in the owner’s manual. If you don’t have either, most of the major bike manufacturers’ websites have a back-catalogue of owner’s manuals dating back many years.
You may find the front and rear tyres have different pressure amounts. It is important to accurately keep these differences as it is important to your bike’s handling. The same goes with your
car, the different front and rear pressures alter the oversteer/understeer of the vehicle.
Do not look on the sidewall of the tyre for the recommended pressures. What is stated there is maximum pressure at maximum load/weight. This pressure will generally be way too high!
What language are they talking?
This is where it can be a bit confusing. There are three types of measuring units commonly used in the tyre industry.
- Bar (sometimes called atmosphere/atmospheric pressure)
- PSI (pound per square inch)
- KPA (kilopascal)
There are plenty of conversion sites on the internet to convert your bike to whichever measurement you are comfortable with. I’ve grown up using PSI and I find that the easiest but you should only need to convert it once, then commit it to memory. It’s not that hard!
One bar = 100 KPA = 14.5 PSI
Below is an example of a tyre placard:
At Baylink Motorcycle Training Centre our five Instructors have over 200 years riding experience between them. That’s the kind of experience money can’t buy. Unfortunately that’s also a lot of arthritis medication we have to buy!
CLICK HERE to learn more about the Baylink instructors.
What’s the best way?
I think everybody knows to steer clear of petrol station gauges. The accuracy of these is always questionable. And as for service stations that want to charge you for air with those coin-operated machines, well, I will never pay for air! Besides, your tyres need to be cold when checked and even a quick spin to the service station will heat up your tyres enough to give a wrong reading.
Over the years I’ve tried many different ways to check and pump up my bike tyres. I own heaps of various digital and analogue tyre gauges, from the basic pencil type to ones with lights and even one that tells me the pressure in both English and French (I can’t speak French). I own a compressor and an air hose, I’ve tried plunge pumps, foot-pumps, 12-volt pumps and it’s still a pain-in-the-butt of a job. To make matters worse, my current bike needs a right-angle valve extension to be screwed on so that most inflators are able to get into the rear wheel’s valve. Design fail!
Why it’s taken me 25 years of trial and error to work out the most simple and logical way to check and inflate my tyres, I’ll never understand. So, I’ll save you the stuffing around and tell you the best way. It will take about 2½ minutes (I just went out and did it then and timed it) and it’ll cost you about $50!
Go to a motorcycle or bicycle shop and purchase a floor-type plunge pump with a built-in gauge. Check the accuracy of the gauge before you buy. I’ve had a few. Some are hard to read, some are way off and some make it hard to accurately get, say, 28psi. Just recently I purchased a plunge pump with a digital gauge on it, just to add to the pump collection. This is accurate and you are able to nail it down to 0.5 of a psi. You may pay a few more bucks to get this type of pump but trying to read 28psi on the pump’s small gauge that goes up to 130psi is very difficult.
It’s Easy
- Put your bike on the centre stand or paddock stand.
- Take the valve (dust) cap off – I like metal caps with rubber O-rings inside for a better seal.
- Attach the pump, most types will need one pump to show an accurate reading.
- You should be close to the recommended pressure you have either committed to memory or written on the shaft of your pump (that’s a good idea!).
- If you need more than 10 pumps to reinflate your tyre, you either have a slow leak or you haven’t checked them for a while!
- It’s pretty rare that I ever need more than five pumps at any check and most of this is due to the air that leaked out while I messed around attaching the pump to the valve.
As you can see, the job is so simple to complete but the benefits are so great, you’d be stupid not to!

For the first few times you do this, just recheck the pressures with an accurate gauge to reassure yourself your new pump is accurate.
Tread wear
While you have the bike on its stand, take the time to look over each tyre and assess how the tyre is wearing. Just about every tyre you buy will have multiple ‘tread wear indicators’ around the tyre. You find these by looking at the edge of the tread near where it joins the sidewall. You may find an arrow, the letters TWI or the tyre company’s logo. If you then look across to the middle of the tread you will see a little lump or bar of rubber raised up from the void of the tread, they are usually about 2mm higher up from the base. They are very easy to see on a new tyre, sometimes not that easy on a used one. They are in different places across the tread so it’s best to look at a few around the tyre to get an overall view of the tyre’s condition. Once the wear starts to get close to these indicators it’s time to start thinking about a new tyre.
If you try and run your tyres down too low, not only will your grip levels in the wet diminish but you have a far greater risk of getting a puncture.
Remember, if the tread reaches the tread wear indicator at any point, the whole tyre is unroadworthy. Most tyres used on the road will wear the centre well before the edges.
Tube or tubeless, what’s the difference?
This is sometimes misunderstood so I’ll take a little time to explain this topic. Most modern road bikes these days run a tubeless type tyre. This basically means as the name suggests that it does not run a tube to hold the air in the tyre, like your old pushbike used to do. The rim is totally sealed by the tyre’s bead, which is the area that contacts the rim. It seals with such force that it forms a tight enough seal so as not to let air escape. Even some modern stainless steel spoked rims on retro bikes are tubeless these days.
A tube-type tyre does not have this tight seal, therefore a tube is needed to hold the air.
So what?
The tubeless design offers a couple of important safety benefits. Firstly, by having less mass (tyre and tube) there is less heat build-up and remember heat is the enemy of rubber. Secondly, if a tube
If you have never done an on-line training course before CLICK HERE to sample one of the Complete Rider free course options.
gets punctured it goes straight down, it pops like a balloon and air rushes out of the now exposed valve hole. This gives very little warning and may result in loss of control.
When tubeless tyres were first introduced, they were marketed with a very simple demonstration. They blew up two balloons to the same size. On one they put a small piece of sticky tape. On the other nothing. They put a pin in the one with no tape and it popped, they then put a pin through the sticky tape on the other balloon and it went down slowly. Kids love this magic trick at birthday parties! This is what a tubeless tyre is designed to do. By the tyre going down slowly you will have the time and control to get the bike stopped even from high speed. Sometimes shops will repair a tubeless tyre by putting a tube in, but you need to remember that your safety will be affected by this cheaper fix. One disadvantage of the tubeless tyre is that if the pressure gets very low the tyre can roll off the rim causing instant deflation! A tubeless tyre needs pressure to keep the bead mounted on the rim, so that’s even more reason to keep check of your tyre’s condition.
Condition check
For your general safety it is important to have a detailed look at your tyres, and when you have it on the stand is a good time to do this. You can do it in your garage using a reasonably strong flashlight. Start with the valve at the bottom and rotate the tyre around, it’s often easier to have a rag in your hand to clean the surface while you are looking. You are looking for anything abnormal, nails, rocks, cuts, splits, age cracks, tread wear indicators or anything else unusual about the tyre or the wheel. If you do it regularly you will soon notice any small issue before it becomes a big problem – one small nail can ruin that relaxing Sunday ride. You would be surprised what I’ve pulled out of my tyres over the years before they had a chance to cause a puncture!
CHAIN
The chain, too, is an area that all the bike shops said is represented in most people’s motorcycle neglect, and like tyre pressures, it’s really not that hard to keep on top of. The three basic areas of concern are:
- Lubrication
- Tension
- Wear and condition
The sticky subject of chain lubrication
Again, this is another easy job and a cheap job too. At the most it should take five minutes to complete. But why is it important to lubricate a chain?
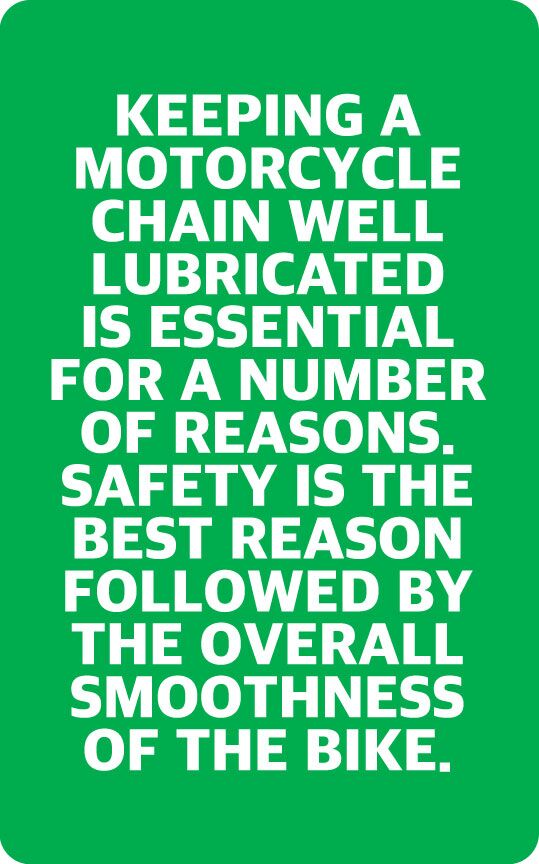
Keeping a motorcycle chain well lubricated is essential for a number of reasons. Safety is the best reason followed by the overall smoothness of the bike, and let’s not forget the financial benefits as well. But for me, when I look at a person’s bike and its chain, I can pretty much tell just what their attitude to safe riding practices really is.
Most modern motorcycle chains these days are normally a sealed type of chain called an ‘o’ ring type, which means they have tiny rubber ‘o’ rings that create a seal for the roller and the bushing pin. This seal not only traps in lubrication – metal on metal always has an element of wear so without lubrication the wear rate increases. It also stops grit contaminating this area causing even more wear.
This rubber ‘o’ ring has developed over time into ‘x’ and ‘z’ ring type, these are still a circle-type ‘o’ ring but have a different profile that helps to trap in the lubrication.
Even with these sealed-type chains trapping the lubrication in, over the life of your chain you will still need to ‘top up’ that lubrication.
When we talk about metal-onmetal wear we also need to consider our chain and sprocket assembly. All our power is transferred to the rear wheel via our chain and sprockets. On most modern bikes this force is brutal and the RPM our chain achieves is mind-blowing. Think about the amount of times the chain contacts the sprocket teeth every minute we ride and then add in the acceleration and deceleration factor. If we don’t run a correctly lubricated and adjusted chain, the wear rate will be much higher, therefore our costs will be much greater as well. To most people this is more important than crashing and getting hurt.
The smoother your chain runs, the smoother your bike feels. Your power delivery will be ‘kinder’. You will have improved fuel economy and there will be less chance of a chain failure resulting in a crash.
How often?
The best answer here is, a little bit of lube more often!
It will depend on your riding conditions but I believe a small amount of lubrication more often is better than drowning the chain when it’s well overdue. For me it’s simple: when I fill up the fuel tank it’s time to lubricate the chain. That’s every 300km to 400km (250 miles) for me. I fill up my bike
At Baylink Motorcycle Training Centre we can teach you how to ride safely and we are the best at what we do. CLICK HERE to see our courses.
in my garage with plastic fuel containers because I just can’t be bothered with the whole helmet off, gloves off, find the wallet ritual at the fuel station. It also makes me find 15 minutes to do the routine bike maintenance that we are discussing here. Certainly, if you have filled up with two tanks of fuel and not checked either your tyres or chain, it is well overdue.
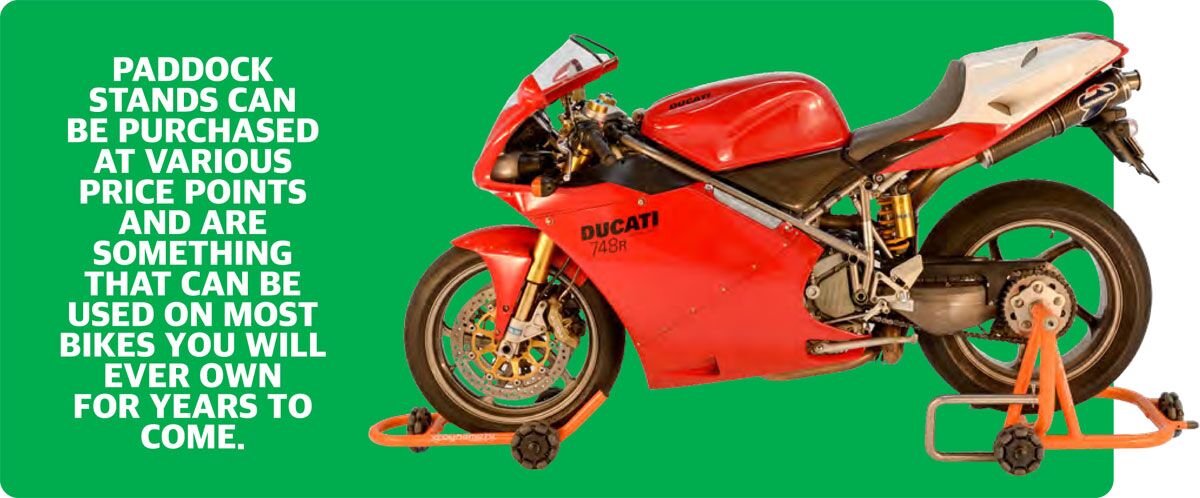
So, just like for your tyres you will need a centre stand or paddock stand to get the rear wheel off the ground. Paddock stands can be purchased at various price points and are something that can be used on most bikes you will ever own for years to come. The ones pictured above are a brand called Dynamoto, a great Aussie invention that allows you move your bike around in any direction due to the wheel design. Note with this stand the bike’s front wheel will not spin for inspection www.dynamoto. com.au
First, you need to inspect the chain and assess the overall condition.
- Spin the wheel in the forward direction, does it run smooth?
- Has it got tight spots? Spots where the chain links looks stiff?
- Is it too loose? (See chain tension, below)
- Is the chain clean of dirt and grit?
If it spins smoothly but has some road grit in it, your chain may need a clean. This dirt and grit that is picked up off the road can stick to your chain and cause premature wear – think of it like a grinding paste, eventually costing you more money.
I find if I clean my chain every four tanks of fuel and lubricate it every tank, I get a long life from my chains.
A good-quality aerosol chain cleaner for about $20 lasts a couple years. It’s easy to use and nowhere near as messy as other chain cleaning techniques.
Spray the chain cleaner on, wait a few minutes and wipe it off, it’s that easy! If the chain is particularly dirty you may need a cheap toothbrush to loosen the dirt first but if you are cleaning it regularly this is generally not necessary. That being said, if your chain is a really bad and it has not been cleaned in a long while you may need to attack it with kerosene and a chain brush. You will soon find out what a horrible job this is and you will never let it get this bad again!
Don’t be tempted to use any fluid harsher than kerosene. It may damage the ‘o’ rings. Don’t use de-greaser or a high-pressure hose for that matter as it may wash away all the lube that is applied and sealed in when the chain is manufactured.
Now that your chain is clean it’s time to re lubricate it. The best way I’ve worked out over many years of trial and error is this:
- With the bike up on a stand and in neutral, turn the rear wheel in the forward direction. Don’t be tempted to be slack here by starting the bike up and put it in gear, then letting it idle to turn the rear wheel. It doesn’t take too much to get a couple of fingers caught in the chain and sprockets, it actually happens more often than you think. Google it up if you want to vomit!
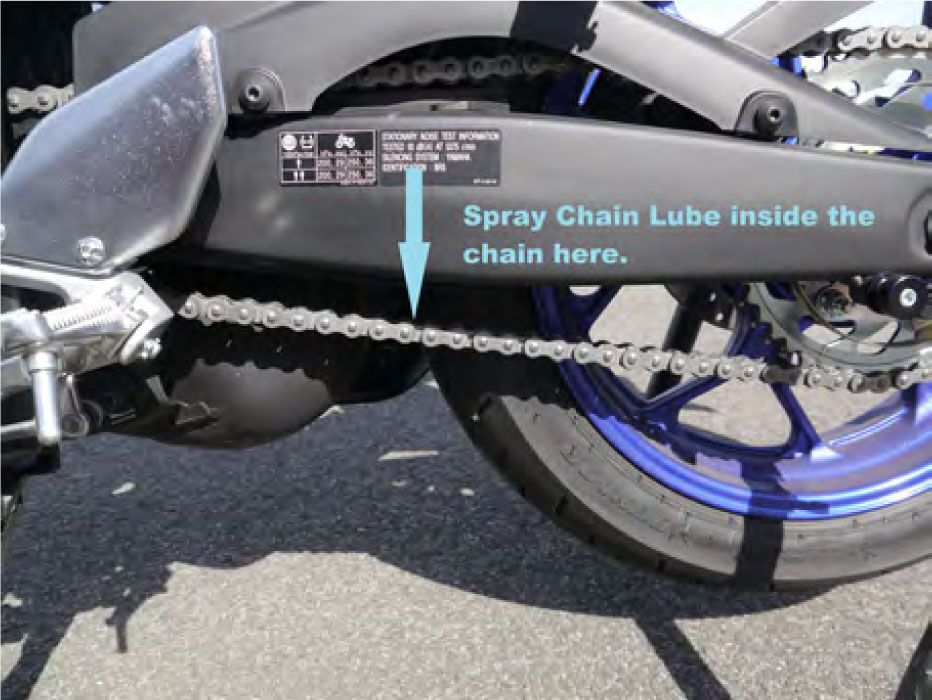
- You are looking to spray the lubrication between the middle of the two sprockets on the lower/ bottom chain run. Be sure to keep it away from the tyre’s surface. This definitely doesn’t need lubrication. You will generally be able to spray so as not to get any lube on the frame or the
At Complete Rider we will tell anyone who will listen just how good our book and on-line courses are but we’re sort of bias. CLICK HERE to read a totally unbiased review of the content at BikeReview.com.au.
swingarm. A rag or newspaper on the ground keeps things cleaner as well. You are trying to spray on what is the top surface of the bottom chain run. This is easier using the plastic extension tube supplied with your chain lube, so make sure you get one. A reasonable coating over the inner sides, rollers and the joint between both is what we’re looking for.
- Once this is done for a couple rotations of the rear wheel, keep spinning it for a few more rotations to work the lube in a bit, then grab a rag and wipe off any excess. Don’t wait too long because most lubes go on wet and runny but dry very sticky within 30 seconds to a minute.
- The amount you put on will need some trial and error but what you should find is that if you take the bike for a ride for about 20km you should find the chain lube working its way through the chain and just beading through the outside of the chain, best viewed at the rear of the rear sprocket. What you have just done is use centrifugal force to drag the heated lube through the chain to totally lubricate it. If you have used too much it will fling all over the rear wheel and tyre, if you have not used enough it will not bead up on the outside of the chain. It will take a few attempts to get it right but once you do you will find this method fast, easy, clean and economical. What was a ‘pain-in-the-butt’ job will become a job that you will look forward to doing and take pride in ribbing your mates about their filthy neglected chains.
The tension is rising (or slackening in most cases)
It’s important that your chain is correctly tensioned for both safety and cost factors. It’s a relatively easy
job to adjust but I don’t intend to go into detail about how to adjust it here. There have been so many different adjusting systems on bikes over the years that it would be irresponsible to try and explain how to adjust each of them in one book. Your owner’s manual – remember that little book that came with the bike that’s never been read – will explain how to do it on your particular bike. What I will do, is explain how to check the adjustment on your bike, and if needed, you can consult an expert to either show you how to do it or do it for you.
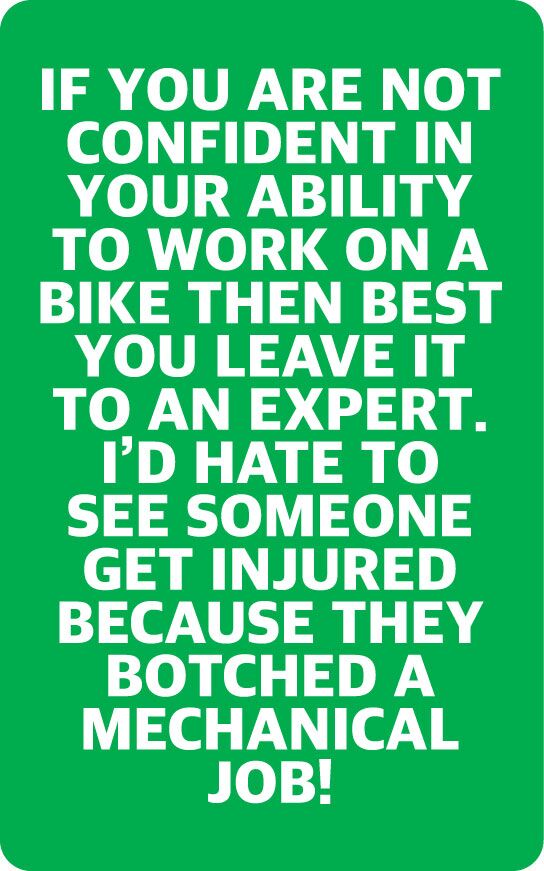
I meet a lot of riders who are happy to admit they have zero mechanical ability. It’s actually great that they admit it. If you are not confident in your ability to work on a bike then best you leave it to an expert. I’d hate to see someone get injured because they botched a mechanical job!
In saying that, though, everyone needs to know how to identify if and when their chain needs adjusting. Then you can work out what is the best option for you to get it adjusted. If you are confident with a spanner and have a few tools but have never adjusted the chain before, then make an appointment with your local bike shop mechanic. Explain that you want to learn the basics but you will still get the main servicing done by him. He should be more than happy to show you what to do. He might charge you a few bucks but it will be money well spent. If he’s not that interested, it might be time to find another mechanic.
‘Give a man a fish and you’ll feed him for a day, teach him to fish and you will feed him for a lifetime’
If you don’t want to even consider doing it yourself, just book it in and get it done. It’s not an expensive job, though it is important to know when it needs to be adjusted.
If you’ve never ever ridden a motorcycle before that’s fine, at Baylink Motorcycle Training Centre we are here to teach you, that’s what we do.
CLICK HERE to book our Pre-Learner course.
Why should I even bother?
Your chain is a vital link between your motor, the rear wheel and therefore the road surface. It needs to be correctly tensioned so as to create smooth drive to the rear wheel. As the rear suspension moves up and down, the distance between the front sprocket and the rear sprocket changes. Because of this we need to have some ‘slack’ in the chain. If the chain tension is too tight, when the suspension falls or rises to full extension the chain may wear, commonly referred to as ‘stretching’, or worse, it may break.
Stretching means a shorter chain life, breaking may mean losing control and hitting the ground. Both are not good outcomes. Luckily chains don’t usually get tighter, they get looser. As the metal chain wears it will ‘stretch’ in time and get ‘slacker’. This is what we see with most chains. The word slacker is apt here as there is only one word to describe people who let their chains get to a dangerous state.
The chain ‘slaps’ around, making all sorts of noises. Throttle control is diminished as the chain clunks on and off with power. When it gets this bad, it generally has tight spots and links that are seized at unnatural angles. It no longer runs around the sprockets smoothly causing more wear. If you back the throttle off too quickly the chain can overrun the front sprocket and derail like your old pushbike used to do. Then you’re in a world of grief!
If this happens, the chain can damage your engine cases, lock up the rear wheel and crash, resulting in damage to your bike, your rear tyre and your skin.
Do I have your attention yet?
If not, how about the fact that an unmaintained chain can wear the chain and sprockets five times quicker than a well-maintained chain set? That’s big bucks each year that you could be spending on more bling for your bike.
Where do you start?
The best spot to start is your owner’s manual, or if you haven’t peeled them off yet because you thought they looked daggy, the stickers on the chain guard. This will clearly explain how much tension
your chain needs. It differs for all bikes depending on its intended use.
As a guide it’s normally about 20mm to 25mm (no more than an inch). I use this as an example only, not for you to use it as a guesstimate but to explain that, for instance, I have an Adventuretype bike that needs 35 to 45mm (nearly 2 inches) slack because it has long-travel suspension. So, take the time to investigate your bike’s specific requirements.
By now you will have cleaned and lubricated your chain, checked that it runs smoothly with no seized links. While it’s still up on the stand, check that the tension is uniform at different spots around the chain. Do this by rotating the tyre to move the chain. The chain needs to have the same tension all the way around its circumference. Sometimes you may find that the tension differs as you rotate the chain. This is a sure sign the chain needs replacing.
Before you drop it down onto the ground for your final tension check, it’s a good idea to check the rear wheel alignment. This checks that the rear wheel is running true or in line with the front wheel. If the rear wheel is out of alignment this will cause a very ill-handling bike. It’s easy to check. You will find a number of marks or numbers near where the rear axle bolts to the swing arm. They should read the same on both the left and right sides of the swing arm. If there are no markings, you can measure the distance from the centre of the axle to the end of the swing arm. This is providing you don’t have a single-sided swing arm. If it doesn’t look right, get it to your bike shop for a check by a mechanic. As stated before, all bikes are different and there may be a good reason for the difference. It’s just better to be safe than sorry!
Checking the tension
You now need to drop the bike off its stand so that both wheels are on the ground. You need to ‘load’ the bike up to its normal riding weight. If you are new to this, grab a friend to sit on it. Once you’ve done it a few times you will be able to do it by yourself. You will soon get an idea of the tension required for your bike.
For just $15 you can purchase the eBook copy of Complete Rider.
With over 160 pages and over 100 thousand words you will go from All the Gear, No Idea to an expert in no time. We cover everything you need to know to be a Better, Safer, Smarter Rider.
CLICK HERE to purchase.
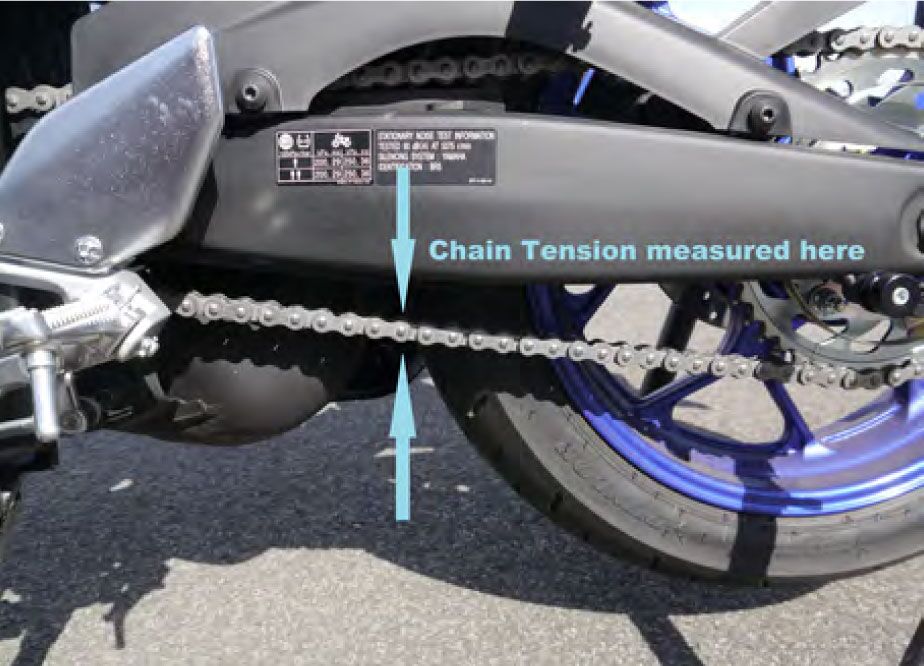
You are measuring the total up and down movement of the chain. This is done in between the middle of the two sprockets and we use the bottom of the chain loop closest to the ground where you would apply the chain lube to. After a while you will get to know what your bike needs, but to start with, use a ruler next to the chain to measure it. You will find most manufacturers will use a 5 to 10mm variation. If your chain falls within these specifications, all is good.
It’s always a good idea to roll the bike forward and check it again at a different spot on the chain just to make sure there are no tight spots.
If you find your chain is out of specifications for your bike, it’s time to adjust it or get it adjusted by an expert. If it’s getting close to needing to be adjusted, do it sooner rather than later in order to avoid damage and extra costs.
Condition and wear
We have touched on some of these issues in the last few sections of chain maintenance but it’s important to look over the general condition of your chain when lubricating or checking the tension. Remember the main areas we are looking for are:
- Smooth, effortless running
- No tight spots
- All links are at similar angles
- No damage or broken ‘o’ rings (strange bits of rubber hanging off the chain)
- No rust or excess dirt or road grit
- No excessive noise
- It’s also a good idea to check the joining link, especially if it’s a clip-type joiner, i.e. is the clip still in place and not worn?
If anything else looks dodgy, get it looked at by a professional ASAP.
We also need to check to see if our chain is not stretched and in need of replacing. Chains have a service life and do wear out.
When we talk about chain wear or ‘stretch’ as it is commonly referred to, we are really talking about the bushing that the link pins run in, wearing away
with time. This wear elongates the bushing, creating a longer chain. This is what is referred to as ‘stretch’ even though the metal doesn’t actually stretch, it wears. If you replace your chain before it gets too badly worn you may be able to get away without replacing your sprockets each time you replace a chain, but the most you should get is two chains to one set of sprockets.
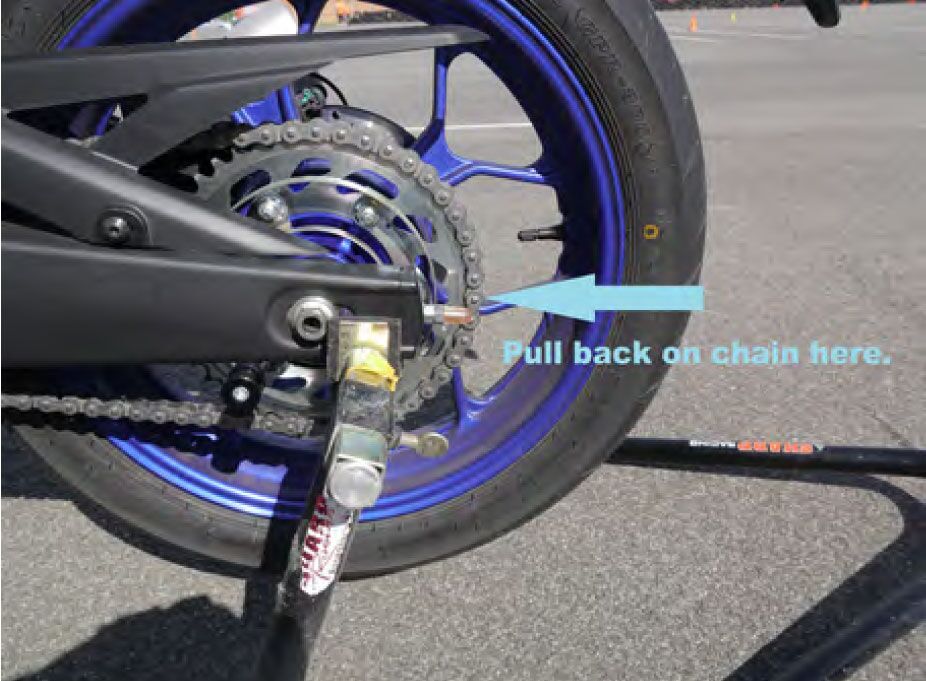
We check the wear by seeing how far we can pull the chain back off the rear sprocket. To do this, we engage first gear and with the engine switched off, push the bike forward with the clutch out to apply some tension on the chain. Put the bike on the side stand with this tension still applied. Go to the rear of the bike try to pull the chain away from the rear sprocket; this is done at the very back middle or 3 o’clock on the chain and sprocket assembly for most bikes. If your bike has its chain on the right-hand side like some European bikes, it will be at 9 o’clock.
If the chain pulls away from the sprocket by more than 3 to 4mm (3/16th inch) it’s on its way out. Remember, change it sooner rather than later if it’s the sprocket’s first chain to guarantee a second chain on your sprocket’s life.
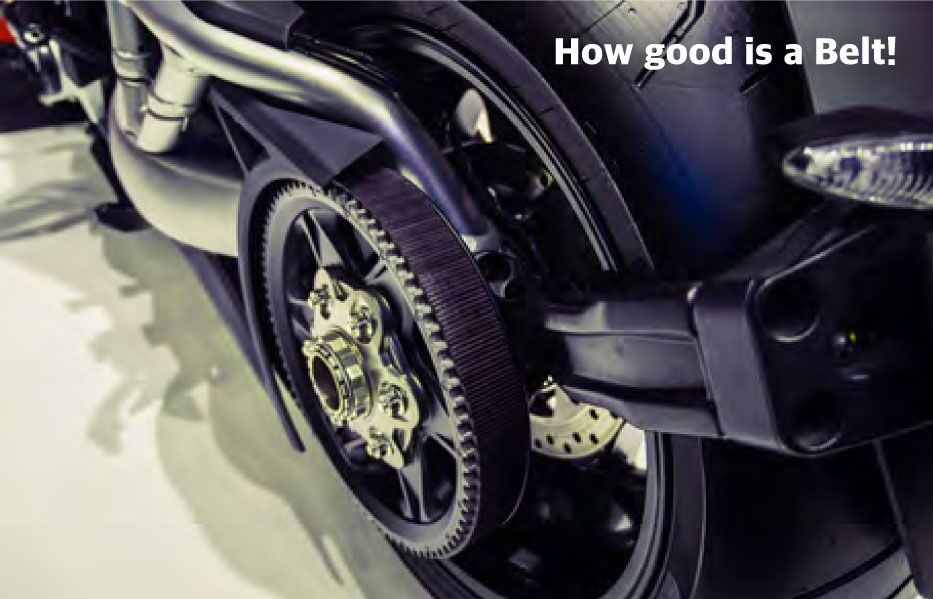
Belts
If you have a belt-drive bike, then your life is pretty easy. I had a daily commuter that I did over 40,000km (25,000 miles) on with a belt and it was just the best. No adjusting, no messy lubricating, smooth and quiet and I never replaced the belt in all that time. Should have them on all bikes, I say!
All I ever did was look over the belt every time I checked my tyres. You are looking for any stones caught in the belt, cracks or damage to the belt teeth or fraying on the edges of the belt. Most belts will get checked for tension when serviced or a new rear tyre is fitted so I just used to give my belt a little push to feel the tension was still good.
This bike has been retired to the back of the shed for now but I drag it out a few times a year just for old times’ sake and yes, that belt is still going strong. Remember, you buy bikes you never sell bikes.
Thinking of doing your motorcycle licence? Then Baylink Motorcycle Training Centre is the place to go. Located on the beautiful Mornington Peninsula, surrounded by quiet rural roads, ideal conditions in which to learn to ride.
CLICK HERE to book this once in a life time experience!
BRAKES
Your brakes are probably the most important mechanical component on your motorcycle. You use them all day every day and don’t think much about them, but one day you will need to rely on them to save your skin. It’s in this situation that they need to be in perfect working order.
The main components we need to familiarise ourselves with are:
- brake pad wear (drum shoe wear)
- brake fluid
- brake lever adjustment
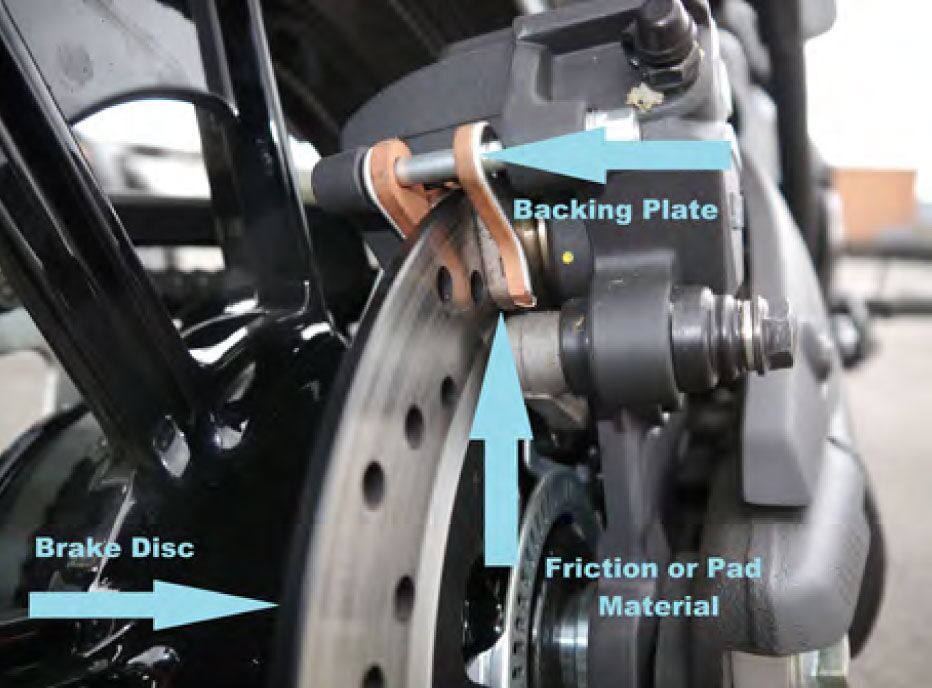
Brake pads
Most modern bikes run disc brakes front and rear. Some retro-style bikes may run a drum brake on the rear for cosmetic effect. Some may have a single disc up front, some run two depending on the bike’s intended use.
The basics of a disc brake setup relies on the use of special fluid pushed under pressure from the lever, which is attached to a master cylinder, via special hoses, down to the caliper that houses the brake pads. Brake pads use a compound of various materials that are pushed up against a metal disc, one pad on each side of the disc. This creates friction which in turn slows the bike down. It is a very efficient sy stem th at pretty mu ch looks after itself. Once set up correctly there is not even a need to adjust anything as the pads wear. But there are some basic checks we need to complete on a regular basis to make sure our brakes work to their optimum performance when we really need them.
Most importantly, you will need to know how to check the wear of your brake pads. It’s a simple job and should be part of your routine maintenance. The start-life thickness of a motorcycle brake pad’s friction material varies between bike type. This friction material is bonded to a metal backing plate of approximately the same thickness. In normal road riding use, I generally get just over 20,000 kms (15,000 miles) from a set (two pads for each disc), at a cost of about $50 a set plus some labour, or less if you are confident to fit them yourself. It’s pretty good value for money so I would normally replace my pads when they are about 75% worn, which
generally means I would not run them much under about 2mm (5/64th inch) of friction material left. When your pads get too low, they just can’t disperse the heat as efficiently and heat will cause brake fade and loss of braking ability. So, although you may be able to squeeze an extra few thousand kilometres out of your pads, it’s just not worth running them past their optimal usable life.
To check the amount of pad life or ‘meat’ left, you will need a bright flashlight. I use an LED flashlight as the white type of light is much better for hard-tosee places. It’s best to position yourself in front of the front wheel or behind the rear wheel for the rear brakes. Shine the light on the caliper and you will see the pad material touching the metal disc rotor. If you have more than 2mm of friction material left, you’re okay. If you have less, it’s time to consider new brake pads. Make sure you don’t get confused with the metal backing plate. You should be able to clearly see the friction material and the backing plate of the disc pad. If you have a new bike it’s a good idea to start looking at your pads from day one so you have a reference as to what brand-new pads look like. While you are looking at the pad thickness, pay special attention to the evenness of the wear between the inside and outside pad(s), or if you have twin disc brakes, look to see that both sets of pads are wearing evenly.
As with all of these mechanical components on your bike, if anything looks strange or unusual, get the beast to the bike shop for a second opinion. While you’re down there, make sure there is no fluid weeping from anywhere around the caliper. Check the brake hoses (or brake lines as they can be called) for any damage like cuts or cracking, then just try to move the caliper with your hand to make sure that it is tight. One issue that is worth a mention on an older bike is to check the thickness of the disc rotor. As the pads wear, so does the actual metal disc rotor. There is a minimum thickness recommended by the manufacturer. This should be stamped on the disc and is best measured with a set of Vernier calipers for accuracy. If the disc rotor drops under the minimum thickness, this can cause heat build-up, cracking or warping which are obvious safety issues.
At Complete Rider we recommend you just buy a motorcycle trailer and have someone follow you where ever you go.
It’s easier and it will save all the stress on your relaxing ride (mostly drive).
But if you want to know how to ride better CLICK HERE.
Drum brakes
This type of brake is a bit old-school these days. Only retro-look bikes or older bikes use them. They are an enclosed braking system that works by two semi-circle ‘shoes’ with friction material bonded to them, being pushed out onto the inside of a round drum to create friction and therefore stopping. The pressure is generally applied by the lever alone, not via a master cylinder (see brake fluid, below) which is able to amplify the pressure. Sadly, because I think they look so cool, the days of drum front brakes are long gone, as they struggle to offer the braking performance required for a modern motorcycle. That being said, a well setup rear drum brake can offer more than adequate braking and a very good feel as well. As the shoes are enclosed inside the drum it is impossible to see how much ‘meat’ is left on the shoes without pulling the rear wheel off and the drum apart, so most drum brakes have a wear indicator, usually a little mechanical arrow of sorts attached to the outside of the drum. This will show at what point in the life-cycle the shoes are at. Rear drum brakes can be quite effective if set up and adjusted correctly but do require more maintenance to achieve this.
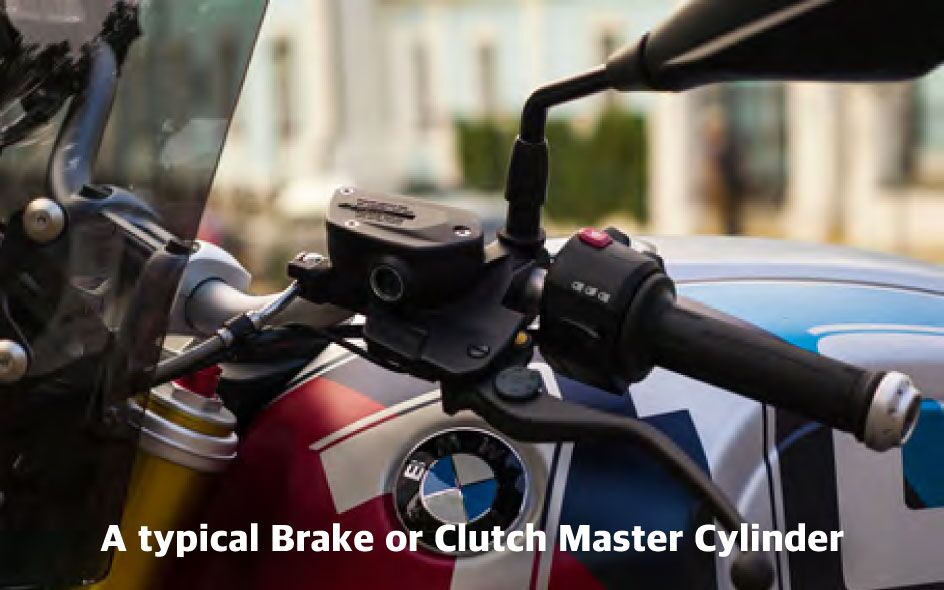
Brake fluid
Modern motorcycles brake systems have an incredible job to do. The majority of bikes of even small engine capacity can easily do 200km/h (125mph). This is achieved in second gear for most modern litre sports bikes, so this means they have to be able to stop from these high speeds as well. As discussed in the section on drum brakes, trying to stop a bike quickly, using only the power of your hand from these speeds would be impossible. Modern disc brakes use a hydraulic brake system. This means when you squeeze the brake lever it actuates the brake master cylinder. This is a small reservoir of special fluid that is pumped down to the caliper at pre-set pressures, to push the pads onto the discs. The master cylinder allows bike manufacturers to alter the valving, therefore the pressure that the fluid is pumped at, to achieve the desired pad-to-disc pressure and stopping ability. A basic way to think about it is that the master cylinder amplifies our strength to achieve greater stopping capacity.
This special fluid, oddly enough called ‘brake fluid’, is vital in maintaining braking efficiency. Brake fluid is designed to overcome many issues like boiling and freezing, so that the viscosity (thickness or runniness) remains constant and the brakes maintain a consistent feel.
The fluid must not degrade the rubber seals or hoses or cause corrosion in the metal master cylinder and caliper assembly, and throughout the lifetime of the fluid it must not change its properties
dramatically which in turn will change the brake feel, consistency and effectiveness of the whole braking system.
As you can see, it’s a big ask for a system that is exposed to the elements like our brakes are.
Consider a day in the life of your bike’s brake system – out in the rain all day in freezing conditions, riding home from work, water and various chemicals from the road surface being sprayed at pressure on your calipers, then generating massive heat as you brake hard at the bottom of the hill. In summer it may be exposed to extremely high temperatures and high humidity levels. It does all of this day in day out, and all you ever see of it, is through a small glass window showing some clear liquid in your master cylinder.
Your brake fluid achieves all of this with relative ease but due to the chemicals used in most brake fluids the fluid is ‘hygroscopic’ which means it attracts moisture. When too much moisture enters the fluid, the boiling point decreases, therefore the brakes’ ability to stop decreases as well. Contaminated brake fluid compresses at a different rate than the bike manufacturer intended, which affects the amount of pressure you need to apply to stop. Moisture will also cause corrosion which can lead to damage to delicate seals and an expensive brake overhaul. To solve this problem, you need to replace or ‘flush’ the brake fluid system. Under normal riding and ambient temperatures this is generally done every two years or so. It’s not that hard to do if you know what you’re doing, but if you are not competent you can make a big mess of it, so leave it to the experts. After all, your brakes are important!
What can you check for?
A basic ‘lookover’ of the master cylinder, brake lines including any in-line joiners and calipers, is all you need to do. You are looking for any fluid leaks or weeping from the system.
If your bike’s master cylinder is fitted with a viewing glass, check that the fluid is at the recommended level and looks clear. Brake fluid contaminated with moisture will look cloudy. If you don’t know the service history of your bike,
Returning to riding after a long hiatus? Before you do, book into one of our Check Ride Courses at Baylink to brush up on your skills before getting back out there.
BOOK HERE
next time it’s serviced get them to flush the system for you, just to be safe. If your brake fluid looks low and you are tempted to top it up, consult the owner’s manual for the recommended fluid type. You are looking for a numbering system like DOT 2, DOT 3, DOT 4, DOT 5, DOT 5.1. All of these do different jobs and in some cases cannot be mixed.
Keeping on top of this basic brake maintenance will ensure that when needed, your brakes will perform their job perfectly.
Note: some bikes will have a hydraulic clutch system as well. You will be able to tell this if the bike has a master cylinder on the clutch side and the same checks apply to this system.
Is it a good fit?
The best brake system in the world is no good if the ergonomics are wrong. Meaning, you need to set or adjust the levers to suit your height, riding position (this may have changed after reading this book and doing the drills), hand size, boot size and type of boot and your braking technique. (You may consider re-reading ‘Rider/Machine Integration’.)
This is a relatively simple job todo and i f done correctly, can give you much better brake feel, speed-up the reaction time needed to start applying the brakes, create less rider fatigue, stop over-revving of the engine (you may accidentally roll the throttle on to get to the brake), locking a brake up or not being able to apply the maximum pressure possible in an emergency brake situation. So, setting the bike up for ‘you’ is vital.
Front brake adjustment
Let’s first look at the front brake adjustment. Most modern motorcycles have two types of possible adjustments:
1. Lever height. The lever height is adjustable on all bikes by loosening the clamp to the handlebars. The front brake assembly will then turn up or down to your desired position. To find the best place for you, you need to sit on the bike with it on a centre stand or paddock stand so that your feet are up on the pegs and you can sit in your usual riding position. Try to relax your upper body and be natural. Slowly bring your fingers out to the brake lever. How does this feel? You should feel natural; your fingers should just ‘find’ the lever. If you have to lift your hand up excessively or reach down to achieve this there is probably a better position for you. We are all different and so are the bikes we ride, so there are no hard and fast rules about how to set up the lever. It must feel right for you! We are looking for a natural action to reach out and apply the brake. Usually that means an extension of your straight fingers. Even if it feels good as it is, it’s a good idea to move the lever just to be sure. As you will be used to it as
it is, you might not realise how much better it can feel. But before moving it, mark it with some tape and a marking pen so you can return to the original position if needed.
2. Lever distance or span. Most modern motorcycles also have the option to change the distance the lever sits from the bars. If this is not possible on your bike and you have unusually large or small hands, then you may consider looking for a (good quality!) aftermarket lever that allows you to fine-tune the lever. Make sure it is the standardlength lever, not a shorty, as you need to be using four fingers. If you have this adjustment you will see a small dial where the lever joins the perch. By turning this dial, the lever’s ‘span’ changes. Original equipment dials normally have four or five positions. One being the largest, five being the smallest. One thing to note: the lever travel amount should not alter, just the distance the lever sits away from the bars.
Ultimately, we are looking to be able to reach out with our four fingers and curl our fingers around and down the lever ending with the lever in the strongest part of our hand as per our braking technique discussed earlier. This needs to be comfortable and natural both slowly and as a fast action for emergency braking.
When changing the lever height position make sure you check that the lever does not foul on any part of the bike when the steering is turned full lock to the left or the right.
Rear brake adjustment
As discussed in our braking section, the rear brake plays an important role in the braking process but all too often in an emergency situation, we tend to jump on the rear brake too hard and lock up. So, in adjusting the rear brake there is a fine line between having it too high and causing our body’s weight transfer to apply too much pressure, or having it too low that we can’t use it proficiently for slow-speed manoeuvring. This is a simple case of trial and error, matching your individual feel with the type of bike you ride. It’s a very important aspect of your riding so take the time to get this right.
I find the best way to do it is to set the rear brake up on a centre stand or paddock first. This way you can get it pretty close to where you think it should be, then take some tools to an open car park where you can fine-tune it in actual riding conditions. This goes for the front brake as well; this can form part of your braking drills later.
At Complete Rider we understand why you ride bikes.
- To look cool
- To help get chicks/guys
We can’t guarantee either but we think we can help. If you use our techniques you will be a Better, Safer, Cooler Rider
CLICK HERE for more INFORMATION
Once you have achieved a better brake feel with this adjustment you may also consider seeing if other components of your bike can be tailored to your body type or riding style as well. These may include your clutch lever, gear lever, handlebars, pegs, seat height or even suspension height.
If adjusting the rear brake lever make sure the rear brake light is still operational, as adjustment may alter the brake light switch.
LIGHTS
This one seems stupid, right? Check your lights! Of course!
An easy job but really, when was the last time you checked that they all worked? I check students’ bikes regularly before we go out on the road and you would be surprised just how often I find basic light functions not working properly. The worst culprit is the brake light/tail light assembly. I’m talking about brake lights that only work on one brake control or not at all. I’ve seen this on brand-new bikes with under 1000km on the clock. Taillights are always blowing on our training bikes. If you consider the tail light on a modern hardwired motorcycle, one where the headlight and taillight stay on while the motor is running, it means it can be lit for a long period of time. If it’s the old-style filament-type bulb, it can generate quite a lot of heat. When you hit a large bump or pothole it doesn’t take much to break that filament.
It’s literally a 15-second job to check your lights are working correctly!
- Turn the ignition on
- The headlight should come on automatically
- Hit the high beam on and off
- Left indicator, front and rear
- Right indicator front and rear
- Have a quick look at taillight, all good?
- While standing on the right side of the bike, apply the front brake while placing your other hand behind the brake light assembly, you will be able see the reflection on your hand even in bright sunlight
- Then do the same with the rear brake as well
- And just hit the horn as well for good measure
Fifteen seconds is all it takes to make sure that you’re able to communicate your intentions to other road users. A simple job, yes, but don’t underestimate how important it is and how often they do blow.
If an indicator bulb blows or a wire comes loose, the indicator should flash fast, flash slow or stay on as a warning something is not quite right.
FLUIDS
It would be remiss of me to write a section on maintenance without discussing the two most important fluids, that being oil and water.
Even though these two fluids were not mentioned by bike shops as being regularly neglected by bike owners, I think that’s because modern bikes are so good at retaining these vital products rather than the owners are so good at checking them.
In saying that, though, run low in one or both of these fluids and you could be in for a nasty shock when you get the quote for an engine rebuild. And never lose sight of the fact that you could get thrown down the road.
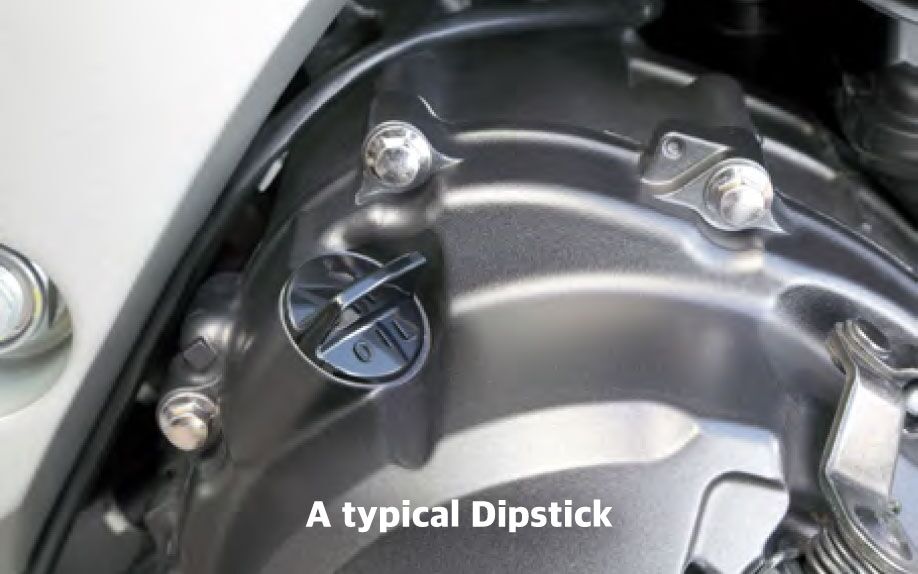
Oil: Oil is the lifeblood of any engine. Just because modern motors don’t ever seem to use any oil doesn’t mean we never need to check it. Especially in the case of small-capacity bikes as they may run very little oil. Our training bikes have only 700mls of oil and that has to lubricate the engine and the clutch, so, it pays to keep an eye on these levels. As with other mechanical jobs, all bikes are different and you will need to consult your owner’s manual to ascertain the correct way of checking it. If you are lucky, there may be an internet owners group web page for your particular model. But be wary of what you read on the internet. As Abraham Lincoln is quoted as saying: “The problem with quotes on the internet is that they are often not true”
Research how you need to check the oil in your bike. For instance, I once owned a bike that had the following as the procedure for checking the oil level: you had to run the bike to warm it up, take it for a good ride, 20 minutes or so, park it at idle until the thermo fan came on, that could have been another five minutes or so. Meaning get it really hot, turn it
At Baylink Motorcycle Training Centre we’ve trained some awesome people over the years and some A listers as well. And although we can’t promise the Wolverine will be in every class, we can promise the most proficient instructors and the most organised and politest office staff of all the training providers on the Peninsula by far!
Click here to see Hugh Jackman with a couple of A listers.
off wait approximately one minute and then undo the dipstick wipe it clean, reinsert it but don’t screw it in, then see if the level was between the minimum and maximum. Now as you could imagine if the oil level was really low you would blow the engine up before finishing this process!!
If you need to add oil, make sure you use the correct type. In an emergency situation the viscosity isn’t that important, just as long as it is close but you must use motorcycle-specific oil for any bike with a wet clutch, which is most bikes these days. Most car engine oils have friction modifiers to increase the lubricating capabilities of the oil. These friction modifiers will cause the wet clutch to slip a nd i n some cases the clutch may need to be replaced, which is costly!
You may find it interesting to Google up the wet clutch system for motorcycles.
Water: Water is cheap, blowing up an engine is not cheap.
This is another one of those jobs that is not difficult or time-consuming but we just never seem to get around to doing. So, please put it on the to do list.
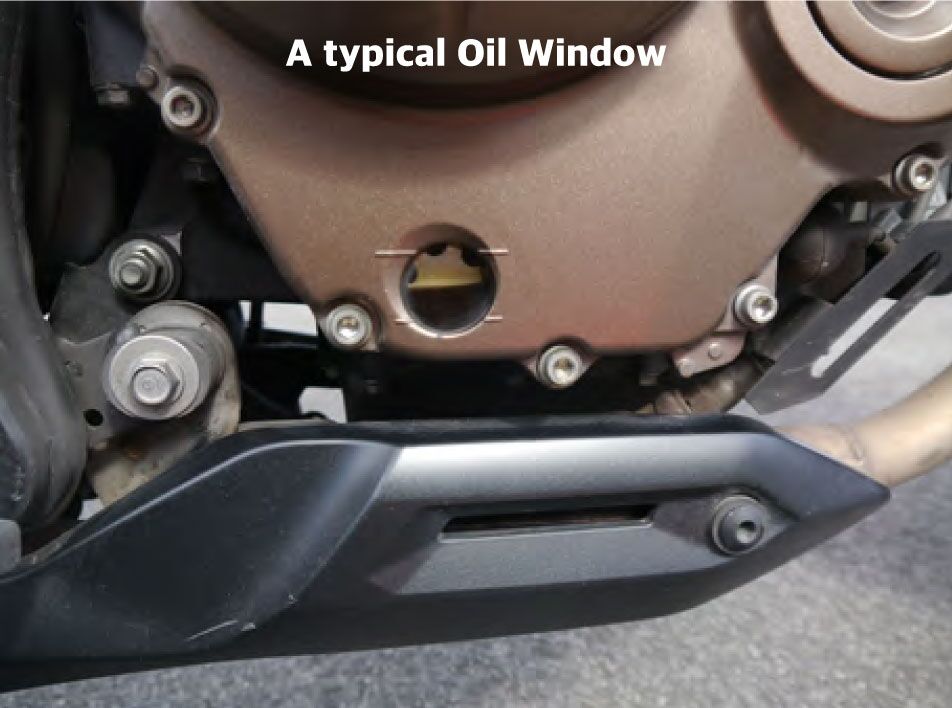
If your bike is water-cooled, i.e. it has a radiator up front, you will need to check the water level. In most cases you will not need to add water, just check it. You won’t need to pop the radiator cap off either, just about all bikes have a transparent plastic reservoir that allows you to quickly see the water levels. In most cases you will not need to take any fairings or covers off. Just have a quick look to see if the water is above the minimum level. Research the recommended procedure by the bike’s manufacturer, so the reading is at least accurate, i.e. cold engine, hot engine, motor running or turned off etc. If you do need to add water and you are not on the side of the road already boiling, you should consider adding distilled water or at least tap water that has been boiled. Tap water can be full of minerals that can cause corrosion in both the radiator and the engine block, that’s why it is at least recommended to boil tap water for a few minutes before using it.
Some motorcycle manufacturers recommend changing or flushing the coolant as part of the regular service of the bike, so make sure your mechanic is on top of this. In some cases, this may be the reason why your authorized dealer may charge a little more than others, so make sure you are getting the job done properly ‘by the book’ whoever you take the bike to.
Is there any other water in your bike?
When I discuss maintenance in my learner/novice classes I pose this simple question: What is the other water in your bike? The most common answer is: ‘windscreen washer fluid’. Seriously!
No, it would be battery fluid, not exactly water but we may need to add it. If your bike has a battery you are best to keep it in good working order. You can dramatically extend the life of your battery if you look after it. Modern bikes with modern electrics seem to chew through batteries more than ever and they can get expensive.
Let’s face it, there is nothing worse than a flat battery. It always seems to happen when you are running late already. I once had a flat battery on my first electronic fuel-injected (EFI) bike. I tried to roll-start it down the hill from my house like I had done with other bikes before, but it wouldn’t fire. So, I kept going down the hill further and it still didn’t fire. So, I then had to push a 200kg (440 pound) bike all the way back up the hill in full riding gear, then get in my car and drive to work, sweating like a pig. It was then I was told if the battery has too little power to run the fuel pump, various sensors and the ignition system it probably won’t start anyway. I laughed the other day when a colleague arrived at work on his wife’s scooter with sore arms from pushing his bike back up a hill, after he had just tried to roll-start his EFI bike. He left it halfway up and called the bike shop to pick it up!
Sometimes it can be as simple as topping up the battery with distilled water every now and again when needed or disconnecting the battery if you plan on leaving it for any length of time. You may also consider putting the battery on a good quality trickle charger.
These are a couple of basic tips that will save you wasting good money on new batteries way too often.
Give it the once-over
In this chapter so far, we’ve looked at some of the individual parts that are important and often neglected. It’s a good time to give the whole bike a good overall health check.
So, while the bike is on the stand, take a bright LED flashlight and look everything over. You are not looking for anything in particular, just anything unusual. To start with, you may not pick any
Are you too lazy to read a book? That’s OK, at Complete Rider we have you covered with our Online course! The On-line course is like an Audio-book on steroids!
We read it to you while you ride along on some of the authors favorite roads. We show you the pictures in the book and some other mildly amusing photos as well.
CHECK IT OUT HERE
problems but you are creating a map in your mind of what your bike looks like. That way you will notice any changes that take place over time.
What are you looking for?
Start at a particular place on the bike each time. I start at the front wheel on my left side and I work my way around the bike, going up and down as I go. You are looking for anything unusual like fluid leaks, missing nuts or bolts, loose spokes, rubber boots out of place, cracks, rust, corrosion, rub marks or witness marks or loose plastics. Use your hand to grab and look for excessive movement in parts, worn parts, try and look behind the plastic fairings as well. Lie down and look under your bike. Give yourself the best opportunity to see any potential problem before it’s too late. This quick check could save having a crash or an expensive bill at the bike shop.
I believe it’s very important to give your bike a wash and a good clean! Apart from the fact that a cleaner bike seems to run smoother, it makes it much easier to spot a potential problem before it’s too late. You will be surprised how many issues have been found while cleaning a bike. Make sure you stay away from slippery silicon tyre-shine products – these mixed with a little bit of water left on the bike makes for an interesting test ride! I find a bit of brake cleaner brings the tyre sidewalls up a treat and is designed so as to not harm rubber brake components. So, spray it on a rag and rub it on the sidewall to keep it away from paint and plastics.
Even if it’s a commuter bike, and it will get dirty again tomorrow, it never hurts to give it a quick clean. It shows you have some pride in your machine.